Page 2 of 2 FirstFirst 12
Results 16 to 23 of 23

Thread: Aarons M2s and what I learned along the way...

  1. #16
    Senior Member hsosdrum's Avatar
    Join Date
    Oct 2009
    Location
    Burbank, CA
    Posts
    295
    I myself can barely nail two boards together, but I constantly marvel at the extremely high degree of woodworking skill possessed by some of our members. Aaron, not only do I appreciate your skill and patience, but as one who creates user manuals for a living, I also appreciate the care and detail you've taken in your step-by-step explanations of exactly what you're doing.

    Although I'll never, ever attempt a project like this myself, I'm thoroughly enjoying this thread (as well as the many other step-by-step DIY threads, like the one by y60kuro documenting his 4343 rehab journey).

    Thanks, Aaron!

  2. #17
    Senior Member srm51555's Avatar
    Join Date
    May 2013
    Location
    Wisconsin
    Posts
    623
    Quote Originally Posted by hsosdrum View Post
    ...I'm thoroughly enjoying this thread (as well as the many other step-by-step DIY threads, like the one by y60kuro documenting his 4343 rehab journey).
    Me too. Properly done work instruction like this takes forever and is much appreciated.

    Aaron are these pictures of your original build or another set?

  3. #18
    Senior Member
    Join Date
    Oct 2003
    Location
    Texas
    Posts
    1,863
    Is glue the only thing holding the wood trim piece to the edge of the plywood?

  4. #19
    Senior Member Flodstroem's Avatar
    Join Date
    May 2004
    Location
    Norway
    Posts
    472
    Quote Originally Posted by hsosdrum View Post
    I'm thoroughly enjoying this thread (as well as the many other step-by-step DIY threads, like the one by y60kuro documenting his 4343 rehab journey). Thanks, Aaron!
    I totally agree to what hsosdrum says and this thread will be my no:1 guide when Im going to start with my own M2 project as soon as the woofers are in house
    Flodstroem

  5. #20
    Senior Member ivica's Avatar
    Join Date
    Jan 2008
    Location
    serbia
    Posts
    1,703
    Quote Originally Posted by Aaron View Post
    The sides:

    The sides are still too big and they're about a little bigger by adding some banding to match your veneer (assuming you aren't going for a painted finish).


    The banding is going to be too large in pretty much every direction...much like what you see here on this LE14 bass bin baffle.


    The CRB7 flush trimming attachment to the rescue!


    A bit of sanding after trimming and it's looking good.

    Stay tuned for the exciting world of test fitment!
    Hi,
    Nice work indeed!

    Ivica

  6. #21
    Senior Member
    Join Date
    Apr 2010
    Location
    New London, WI
    Posts
    163
    Quote Originally Posted by JeffW View Post
    Is glue the only thing holding the wood trim piece to the edge of the plywood?
    Yes, Titebond II and some good clamping force produce incredible bonding strength.

    Paint:

    1. DA Sand the front baffle with 150 grit until it feels pretty smooth and dust it off.

    2. Get some filler primer on it and DA sand it with 220 grit after the 3rd coat dries. You'll probably sand through a bit where the grain stands proud.

    3. Put another couple coats of primer on it and hand sand with a block & 320 grit. You should barely be able to tell it's a piece of wood at this point.


    After step 3, the surface of the baffle should resemble this: it could be smoother, but it's still very flat because we didn't router the woofer & port holes before sanding. There's no point in further paint for now as the circle jig will probably scuff up the finish coat.

    4. Time to pill out the jasper jig or the CRB7 (yup, it does circles too!) and do the woofer & port holes. Always remember to do the countersink of the driver (or ports for that matter) before you actually cut the main hole.

    Pro tip:
    If you want to prevent chip-out when routing holes, get a big compass and mount a small X-acto knife in it instead of a pencil to score the outside of the circle. That way the wood will break off at the score mark every time.

    5. The holes are cut. Now you're just doing whatever the spray can instructions tell you to do. If you gingerly sand between coats with fine paper and the block, the finish coats are gonna look good.


    I forgot to use my own pro tip and had to use body filler to fix the damage.

  7. #22
    Senior Member
    Join Date
    Apr 2010
    Location
    New London, WI
    Posts
    163
    The photos you're seeing are a mix of stuff I took just for this thread and my M2 build. I didn't think I was ever going to do a thread like this so please forgive me if I don't have a picture of every last step (and believe me, I really want those pictures...now I have to describe them!).

    Assembly:

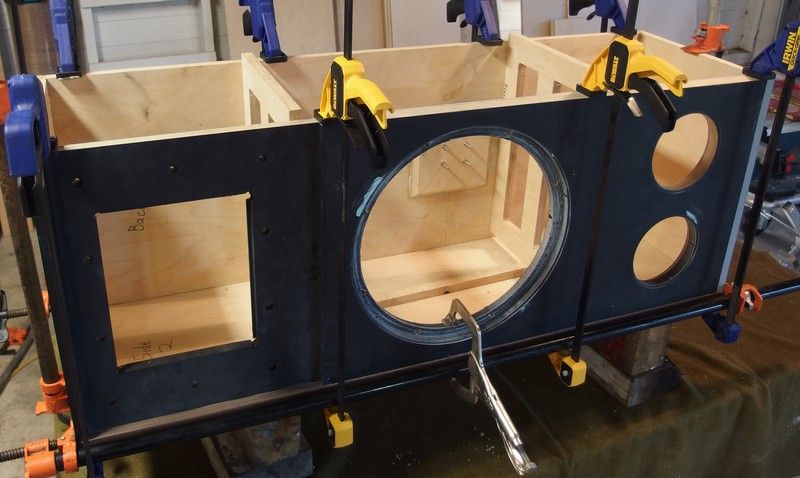
    Now with one side on the bench, apply some glue into the rabbets we made in the top & bottom and assemble the top, bottom, baffle and back together...just those four pieces. When they are clamped together and you're satisfied that everything is lining up correctly, pull the assembly off of the side and clean up any excess glue with a wet rag.

    After a day of the glue setting, we glue the assembly to a side.


    You'll notice there are a couple braces just partially jammed in there to keep the front & back from bowing inward. Also there's two long pipe clamps along the bottom of the pic keeping the assembly square to the side.

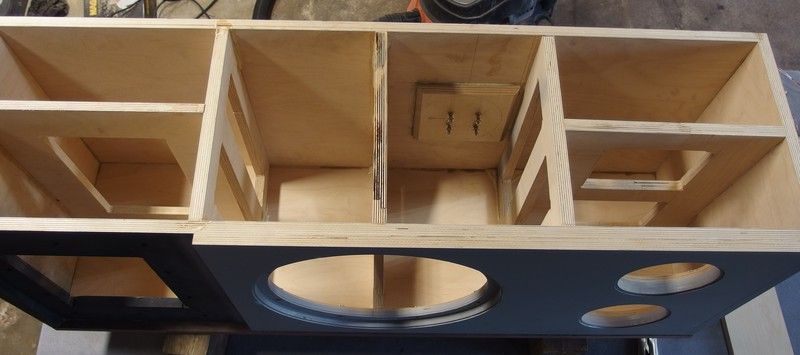
    Now to the braces.


    As before lots of test fitting, followed by glue and many clamps to keep the joints tight.

  8. #23
    Senior Member
    Join Date
    Oct 2003
    Location
    Texas
    Posts
    1,863
    How many 5 x 5 sheets of BB did you go through on this project?

Thread Information

Users Browsing this Thread

There are currently 1 users browsing this thread. (0 members and 1 guests)

Similar Threads

  1. Peter Aczel. What I have learned after six decades in audio.
    By Odd in forum General Audio Discussion
    Replies: 61
    Last Post: 05-11-2015, 10:45 PM
  2. Rotate your Altec Woofer every 10,000 songs - lesson learned..
    By Storm in forum Lansing Product Technical Help
    Replies: 25
    Last Post: 09-23-2008, 09:10 PM

Posting Permissions

  • You may not post new threads
  • You may not post replies
  • You may not post attachments
  • You may not edit your posts
  •