Hi everyone:
I bought a pair of 2405h slot tweeters. They show nicks and scuffs in the paint. What's the best way to re-finish the front faces and get as close as possible original factory looks? Thanks


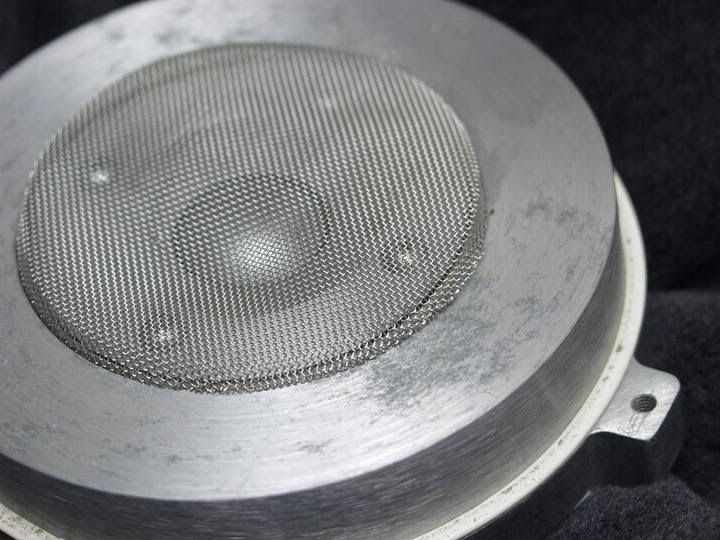
Hi everyone:
I bought a pair of 2405h slot tweeters. They show nicks and scuffs in the paint. What's the best way to re-finish the front faces and get as close as possible original factory looks? Thanks

The slot and horn flare itself come apart.
There are two secrws on the front face of the slot that secure it to the nagnitic structure.
IF you need to take the phase plug out as well ( the black triangular block inside the slots mouth ) youll have to take the horn flare off first, then remeove the foilcal on the back of the dtiver to access the screw the holds the phase plug in place.
Once you have the slots horn and phase plug assembly apart, you can paint them yourself IF you have spray equipment, OR take them to someone who does airbrusihing, or spraying, use a nice high quality paint, you can even go beyond what JBL did, and use a fancier custom auto refinish product. OR, you can have them powder coated. whoever does the work wiill need to prep the damamged aliminum parts, sanding, cleaning, priming, then paint, and POSSIBLY a clear coat.
I might tend to lean towards having them really nicely painted, make a deal with obne of your local auto painting places, as if you put these in a home install and they are visible you would want them to look sharp.
Powder coating is the most durable finish, for commercial use I would do this.
scottyj
IF YOU want that factory finish, that is a matte finish, I think you will have to have them painted professionaly. Unless you have spray guns and compressors, etc.Originally Posted by bert58

Take them apart, be careful when removing the phase plugs, so as NOT to damage the fragile diaphragms.
scottyj

They do, but taking out the center wedge requires first removing the outer horn and then removing the rear label which will reduce their value, but more importantly, unless you are very careful you will likely damage the diaphragm and may not be able to once again center it. There are no guide pins for the ring radiators. To remove the outer horn is straight forward and easy enough though.
Widget

Later models are powder coated, but...
Removing the label is not a big deal. Use a heat gun to soften the adhesive and carefully pry off the label with a thin blade putty knife, careful to not fold or wrinkle the foilcal.
Unscrew the front horn and separate. Unscrew the phase plug screw underneath the foilcal. The diaphragm is centered by a relief in the topplate, so if you don't disturb it you should be fine.
Use a paint stripper from your local paint/hardware store. Scrub off the remaining paint remnants with 0000 steel wool. Clean well with acetone.
Use primer on the horn for a nice smooth finish.
Then spray with matte black Krylon...light coats..two or three.
Might cost 20 bucks and your time. If you mess it up, send it to me.
Edgewound...JBL Pro Authorized...since 1988
Upland Loudspeaker Service, Upland, CA
I also endorse the Krylon and that last line especially.
Widget
I've had good luck with Rustoleum satin black as a good color match.
I use a dual action palm sander and some fine 220 grit papper makes quick work of taking off the old finish. Make shure you wear good mask, aluminum dust isn't something you want to be breathing.
Allen

Instead of steel wool use the 3M color-coded abrasive pads. Green works well. Leave as much of the original finish on as possible so you don't have to re-primer.
For deep scratches on the horn, use a piece of sandpaper (220 or finer ) glued to a scrap plywood and sand in successive straight motions until the scratch is gone. This method also restores the finish to 2403 faces.
Paint stripper WILL loosen the horn wedges and they will fall out. Remember the mike caldwell horn pictures??
sub

Slightly off-topic, but similar:
How do you all restore the finish on an 044? I bought some spares a while back but they're nowhere near as nice as the ones in-place. It would appear they'd have to be turned, rather than just sanded, to get the original finish. I suppose as a last resort I could do a Krylon semi-flat black finish on them and call them 044Tis! Anyone had any luck restoring the turned-aluminum finish on these? Chuck 'em up in a lathe?
I've already repaired the screen, just trying to figure out what to do with the body.

DITTO!!!
Also works on my bullets. 8 are flat black horns, and 4 with shiny aluminum horns.
Its called a "krylon tuneup" for a reason!
I found that I was able to modify a (I think) a 3-5/8" hole saw and press fit the horn into it and spin it on the drill press and polished them with 220 and then the buffing wheel motor bolted to the drill press table. Super Polished!!!
It sounds SMOOTH!!!!! Lisa likes it! ooh!
One step above: "Two Tin Cans and a String!"
Longtime Alaskan Low-Fi Guy - E=MC² ±3db
Make yourself a buffing wheel!
http://images.google.com/imgres?imgu...%3Den%26sa%3DN
Take a 1/2 HP 1725rpm electric motor, and get a buffing wheel mandrel and a couple of 6" white cotton buffing and some buffing compund sticks.
You will surprised on how many things you will use it on!!!
Buff that aluminum up to a shine!!!! Like a Boeing 777!
Otherwise, try a green Scotchbrite pad and a LITTLE elbow grease. Not too much.
Scotty.
One step above: "Two Tin Cans and a String!"
Longtime Alaskan Low-Fi Guy - E=MC² ±3db
Look in this thread.
http://audioheritage.org/vbulletin/s...ight=sandpaper
Just rotating the tweeter frames by hand worked great..
sub
Subwoof,
Thanks for the link and the "120-grit sandpaper" tip.
Looks like to use your method I'd be taking the diaphragms out of the 044s. I was hoping not to have to, unless they're easier to re-align than I've read.
Given the tools I have to work with, I'm thinking of attaching the body to a round piece of plywood and centering it on my wife's pottery wheel and just holding the 120-grit sandpaper against it! Regardless, the results you managed on the 066s are impressive.
Thanks for taking the time to reply. I believe I remember that post now but couldn't find it using "044" to search.
And thought I found true love..
It was an 066 - and I used sandpaper on the search. You can remove the 044 shell without doing the diaphram removal.
The search function could use a MAJOR refinement...
sub
Damn! That tidbit is worth the price of admission. I'm pulling one apart tonight!
Edit/Update: Took one apart. Too easy! (Are those screws supposed to be THAT loose?) A bath in the sink after and some Brasso on the screw heads; look like new. Now I'll probably never need them and the $55 I ended up paying for the pair (LH link/story here) will all have been for naught! Just kidding. I got them for back-ups since I have one-each pair of L112 and L150A. Thanks again. Sorry for the hijack.
There are currently 1 users browsing this thread. (0 members and 1 guests)
 Posting Permissions

 Reply With Quote